Shabby Blog

Showing posts with label food. Show all posts

Saturday, 4 May 2013

Home Ground Coffee - Review


I was recently sent some lovely coffee beans to review from Home Ground Coffee.  We were sent two different bags of beans.  You can have the beans ground to suit whatever coffee making device you have but as a coffee aficionado, Neil has a coffee grinder.

The coffee comes packaged up safely in packs of 250g or 500g.  We really loved the packaging which is very rustic but feels authentic and protects the beans well.  I also like the fact that there are a range of different delivery options which means you can tailor the cost to how urgently you require the coffee!

Another great way to enjoy coffee as a special treat for yourself or friends and family is through a coffee subscription.  I actually bought Neil one of these for his Birthday and he was really sad when it came to an end!  I think this is probably one of the best gifts I've found for him as it was a special treat that he could enjoy month after month.


Neil was a big fan of both coffees, but has written up his notes on Ethiopian blend which was his favourite.  

Out of the pack 

  • The beans smell sweet with a slight hint of acidity and fruit.
  • The roast is medium dark with a good shine.
Once Brewed
  • The fruity notes really become apparent.
  • The coffee is strong without being overbearing.
  • It is a tasty coffee lovers coffee with lots of subtle complexities.
Overall we loved these coffees, they were clearly incredibly good quality, really special and full of flavour.  Now we just have to decide what beans to order next.
_______________________________________________________________________

DISCLOSURE:  We were sent two bags of coffee beans free of charge for the purpose of this review.  All words and opinions are our own.

Thursday, 28 March 2013

Chocolate Orange Fudge Sauce

This months Center Parcs Challenge was inspired by Easter and encouraged us to make some sweet treats.  I often make cakes but haven't made confectionery for ages so this was just the excuse I needed to head out, to get the ingredients, to make some yummy fudge. Or so I thought..!

However, I must admit that it went down hill from there as I couldn't decided on a recipe.  I did eventually pick one but even as I was reading it, it didn't sound quite right.  And my prediction was confirmed the next morning when I found the unset fudge mixture sitting in the fridge.


So it was farewell to chocolate orange fudge but HELLO to hot chocolate orange fudge sauce which I can tell you was truly delicious over ice cream.  To be exceptionally decadent I actually decided to have mine in the bath.


Here's the recipe which is really simple.

You will need:
  • 250g chocolate (I used dark but you could use milk if you prefer)
  • 397g tin of condensed milk
  • 1 tsp orange zest
Recipe:
  • Pour the tin of condensed milk into a microwavable  bowl.
  • Break up the chocolate and add to condensed milk.
  • Microwave gently until everything has melted (be careful not to burn).
  • Mix util chocolate and condensed milk has combined.
  • Add orange zest and stir.
  • Reheat as required.


I am writing this post as part of my role as Center Parcs Family Blogger. To be in with the chance to become one yourself and win a short break to a Center Parcs Village of your choice, share your chocolate innovations! Show us your pictures and recipes, and tweet us including the hashtag #CPFamilyBreaks and your blog link to @tots100 and @CenterParcsUK. The challenge ends at 4pm on the 29th March.  

Good Luck!

Monday, 11 February 2013

Pancake Day Recipes

I love pancakes!  I used to make big fat fluffy ones quite regularly for breakfast while we were without child but these days such spontaneity happens only very occasionally   Which is why pancake day was a great excuse to make that bit of extra effort and cook up some pancakes for breakfast.

My perfect lemon and sugar topping
In actual fact, pancakes are rather an easy thing to make, it just takes a little preparation and you're there.  And the good thing about them is that they are a really simple base that each person can add their own touch too.  My personal favorite is the simple lemon and sugar combination, Neil likes maple syrup and for Nye I add some grated apple and cinnamon while they are cooking in the pan.

Here's the recipe I used, and it worked a treat.


Ingredients: makes 6 medium size pancakes

  • 2 eggs
  • 100g plain flour
  • 100ml whole milk

Instructions:
  1. First I used a hand mixer to beat the eggs until thick (you can use a whisk it just takes longer)
  2. Then add the plain flour and milk gradually. I add 1/4 of each alternating between flour and milk.
  3. Once combined the mixture should be quite loose so that you can easily spread it thin in the frying pan.  If it's still a bit thick add a little more milk until you're happy with the consistency.
  4. Leave the mixture to stand while you heat up a large non stick pan with some olive oil
  5. Add one ladle full of mixture to the hot pan and as soon as the mixtures in, rotate the pan to get a good thin layer over the base.
  6. After a minute or two flip the pancake over and once cooked leave it to the side and repeat until the mixture is finished.
For Nye I cut the pancake into strips, and he was gobbling them up before Neil and I had even had a chance to sit down with ours.


This post is brought to you as part of my role as a Center Parcs Family Blogger, where we are bringing you monthly posts all set around a theme.  Don't forget, you can be in with a chance of winning a short break at Center Parcs for you and your family.  All you have to do is create your own unique pancakes and take pics of the result – don’t forget to share your wonderful recipes, unless it’s a family secret, of course!

Then, just send a tweet including the hashtag #CPFamilyBreaks to @tots100 and @CenterParcsUK, linking to your blog post. This month’s challenge closes at 4pm on 22nd February.

Please find the full terms and conditions for the challenge here and do make sure to be careful with certain ingredients if you are prone to allergies.

Thanks to all the bloggers who took part in our January challenge to create a home spa experience – you can see a Pinterest board of all the entries here.

Monday, 7 January 2013

Spiced Cranberry Sauce Recipe

Christmas has passed but yesterday we used some left over cranberry sauce with some meatballs and I was reminded how delicious it is.  I thought I'd post up the recipe I used for Christmas day as it keeps really well in the fridge and would be great in ham sandwiches and on crackers with cheese. Yum.

Image from Holistic Woman
Spiced Cranberry Sauce

  • 3 cardamon pods
  • 250g fresh or frozen cranberries
  • 50 ml of white wine, I used sweet desert wine
  • Juice of 1 orange
  • 1 tbsp of sliced peel
  • 50g light brown soft sugar


  1. Crush the cardamon pods to split the husks and put in a saucepan.
  2. Add all the remaining ingredients and bring to a boil.
  3. Once the mixture has boiled, simmer and stir for 10 minutes until most of the cranberries have burst.
  4. Take the sauce off the heat and leave to cool in a bowl or jar.
  5. Enjoy.


Monday, 17 September 2012

Thai Chicken Curry with Cauliflower Rice with TOTAL Greek Yoghurt


I heard on the radio the other day that it is estimated that most people have 8 recipes that they use to get them through the week.  I often feel so tired of the usual suspects, working out what to pair with potato, pasta or rice.  So it's nice to do something a bit different, and add something delicious to the usual repertoire.

A few weeks ago I spotted a lovely Thai Red Curry recipe on the TOTAL Greek Yogurt website and asked if I showcase it here.  I was sent the ingredients on Friday and couldn't wait to make it for you all.  This is just one of a thousand new recipes and usage suggestions.  You can find out more their website


Ingredients:

Directions:

1. Boil 100ml of water in a smal saucepan and add the creamed coconut until it had softened.
2. In a frying pan or wok, heat the coconut oil and add the chicken. Lightly fry until cooked through.
3. Add the creamed coconut and water mixture to the chicken,  then add the yoghurt, Thai paste, mixed peppers, mushrooms, mangetout  & green beans.
4. Simmer on a medium heat for 10 - 15 minutes, stirring every so often. Add more water if you prefer a runnier curry.  I added a bit more yoghurt to make it nice and creamy with a thicker sauce.
5. Grate the cauliflower using a cheese grater, knife or food processor, until it resembles rice.
6. Place the cauliflower in a microwavable bowl and cover with cling film. Poke holes in the cling film. It is important to NOT add water. Microwave on full blast for 4 - 5minutes until soft.
7. Serve the cauliflower with the curry and tuck in!


I have to say this dish was really delicious and Nye really liked it too.  He had a good suck on the peppers and managed to get through several pieces of chicken.  I didnt add any seasoning but it was really full of flavour.  The thing that really surprised me was the cauliflower 'rice'. It was so quick and easy  but I worried the strong flavour and smell of cauliflower would overpower everything else.  In the end it added a lovely sweetness to the spicy curry.  I can't help but marvel at what an amazing alternative to rice it is.

I would usually have made this kind of recipe with coconut milk which I don't often have in the fridge so it is fantastic to realise that I can make this with yogurt  and use the coconut oil to give it that nutty taste.

Many thanks to Total Greek Yoghurt for letting me share this recipe and for providing me with all the ingredients to do so.  We've been at a wedding all weekend and I couldn't wait to get home and finish off the leftovers!

This recipe is one of many others being profiled on blogs across the interweb, see if you can find them all and you can win a fantastic prize.  Find all 30 recipes posted across the blogospher and you can win Paul Merrett's list of essential kitchen equipment. The lucky winner will get this amazing wish list including the very best cookware worth more than £800.  For more information you can visit their website or their brand new Facebook app, so you don’t even have to leave Facebook to get inspiration for dinner ‐


Join the TOTAL Recipe Treasure Hunt!

Friday, 1 June 2012

Chocolate and Orange Blossom Mousse

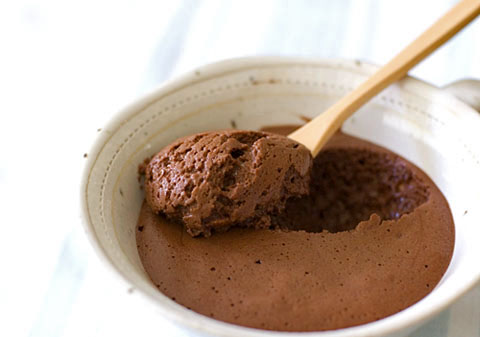
I made my first ever chocolate mousse.  Previously I had incorrectly assumed it was difficult.  I found out that it is in fact easy (as long as you have LOTS of bowls and a electric beater!) Although I don't think you could argue there is much nutritional value other than pure happy indulgence!

I forgot to take a picture :( This is from here


I adapted Jamie Oliver's Recipe from here. (My version uses half and half dark and milk chocolate, alternate orange flavouring to make it a little lighter on the intense chocolate hit.)

Jenni's Chocolate and Orange Blossom Mousse.
Makes 4 small and delicious portions.  Double recipe for more.

Ingredients
* 150g chocolate (I use 100g dark 70% & 50g milk)
* Sea Salt
* 4 Large Eggs
* 50g Caster Sugar (2 1/4 heaped tbsp)
* 150ml double cream
* 1 tsp of orange blossom water (I got this from Waitrose)
* 1 tbsp cocoa powder

Instructions:
1. Melt chocolate adding a small pinch of salt.
2. Separate eggs into whites and yolks.
3. Add the sugar to the yolks and bear until silky smooth (sugar will dissolve)
4. Whisk whites adding a tiny pinch of salt until soft peaks form (can be held over head without falling)
5. In another bowl beat the cream until slightly thick. (just whipped)
6. Add orange blossom water and cocoa powder to yolks and mix.
7. Fold through melted chocolate until well combined.
8. Tip in egg whites and fold in figure of 8 until mix is smooth and evenly coloured.
9. Pour into cups/dishes and leave in fridge to set for 1-2 hours.

ENJOY!

Tuesday, 21 February 2012

Tuesday Linking love

I've been back on Pinterest with a vengeance.  Here's a couple of images from this week that I've been admiring.

Firstly H&M have tracked me down and started sending me catalougues, this cannot lead to good things.  I bought some stuff from their home range for our bathroom and for dressing our table at Christmas and I am now addicted.  It reflects the seasons trends and is SO cheap.


I'm going to try and copy this, once I get round to it...


and finally some FOOD for thought.


Tis my birthday tomorrow, let's see if I can get round to making a yummy cheesecake as I have been dreaming.  A bit like this...


Tuesday, 10 January 2012

Our Holiday

Just before Christmas we had our last couples holiday. It seems like an age ago now but just remembering it makes me smile.  It was cosy, relaxing and very lovely.


It was October when I first suggested to Neil that we might want to go away while we can, i.e whilst we have the time, money and lack of screaming baby.

It started out as an open book; should we go to the spa we've been to twice before and love (http://www.ardencote.com/) or perhaps fly away somewhere.  The German Christmas Markets seemed alluring as I've always wanted to go to Germany as I've heard so much about it, but I soon realised this would be a bit impracticle (heavily pregnant woman flying) and by the looks of it also mighty expensive.  Time passed, we still hadn't made a decision.

A few weeks later, after visiting the Southbank and stumbling upon a small food festival with my dear friend Nicola, I picked up some guide books on luxurious places to stay in Wales where fine food in on the menu.  I wasn't sold at first, but having seen how gorgeous the places looked, how reasonable they were and also the added thought that we are quite settled on naming our son after a famous Welsh politician, it all fit together.  Soon after I started to ponder this idea and managed to convince Neil, I realised that my Godparents actually run a bed and breakfast with amazing reviews just on the Welsh border (http://www.steepmeadow.co.uk/).  So I emailed them to ask about availability and the rest, as they say is history. All the pieces of the jigsaw fit with the added benefit was that we could also bring our dog with us.

So Friday arrived and I booked a day off work so that we could head off as soon as Neil finished work for Christmas.  Unfortunately I forgot to pack the night before so I couldn't pack our stuff in the car before Neil headed off to work, so I ended up taking the train to Plumstead with enormous rucksack and little dog in tow.  It felt like something of an adventure, and became even more of on when we looked at the weather forecast for Wales... naturally it was snow.

The traffic was a pain and poor Neil, after a full day teaching, had to drive all the way there.  We arrived at what felt like the dead of night.  In reality it was about 6pm but the hair raising drive through the hills and valleys as sheets and sheets of snow flew towards us was somewhat terrifying.  When we finally got there and it occurred to us that we were about to stay somewhere called 'Steep Meadow' it also dawned on us that in the snow this could be interesting...  And as we got closer the cars going in the opposite directly had gradually increasing amounts of snow sitting on top of their roofs.  All we could do was laugh and persevere!

My wonderful Godparents were good enough to feed us soon after we arrived as they were already cooking for another couple who were also staying with them, (for what turned out to be the last weekend of business as my Godparents have now sold the house and are in the process of moving).


Sunday, 14 August 2011

Chocolate Oaties

Last night I had the urge for some chocolate oat biscuits like I used to have at break time when I was at Middle School in Long Stratton.  They always came out warm from the oven and had a soft and sweet chocolate icing topping.

I made something similar with my friend Nicky during my A-levels so I thought I'd see if I could look for a recipe online.  All the recipes use a chocolate topping rather than what I remember being a slightly gooey chocolate icing.

In the end I went for this recipe - (Adapted from here)

Ingredients
Serves: 24
  • 225g (8 oz) margarine
  • 225g (8 oz) caster sugar
  • 225g (8 oz) self-raising flour.
  • 140g (5 oz) porridge oats
  • 55g (2 oz) cocoa
  • Icing sugar and 2 tsp cocoa powder for covering
Preparation method
Prep:15  mins | Cook:15  mins | Extra time:30min, chilling
1.
In a large pan melt together margarine and sugar.
2.
When sugar is completely dissolved remove from heat and mix in oats, cocoa and nuts. Mix in self-raising flour.
3.
Turn into a 20x30cm (13x9 in) baking tray and press down well.
4.
Bake at 180 C / Gas 4 for 15 minutes.
5.
Cool then cover with chocolate icing. Chill to set.

Saturday, 4 June 2011

We love burgers! (and sunshine)

Well, what a lovely day it had been today!  I have to admit I spent the first part of the day lying on the sofa browsing ebay and watching 'How I Met Your Mother' with Neil on the other sofa reading through his revision notes.

However he took a break 1-4 and we were destined to head over to Beckenham Place Park but instead he suggested we seek out The Meat Wagon.  (In reality we should blame this particular episode of HIMYM!) As it reminded us of the Meat Easy, a memory we will never forget, greasy burgers, yummy chips and amazing onion rings - my mouth is already watering again and I only had one a few hours ago!

So off we went to Peckham with the dog and there we found are burgers being served from an old ambulance!


You can see I was enjoying it beyond measure! Neil actually wanted another one once he'd finished his cheese and bacon burger but I managed to distract him with the prospect of an ice cream.  It was actually weird to see them in the light of day as last time we were in a dingy dive bar in New Cross! But they were just as good, all served up quick sharp and very enjoyable with a big glass of lemonade for moi and shandy for Neil.  After lunch we picked up some ice creams from the high-street and wandered the park with the dog, bathing in the beautiful sunshine.


Monday, 30 May 2011

Bank holiday monday salsa recipe

I fancied some salsa with my tortilla chips today so thought I'd give it a whirl.  It was surprisingly easy to put together and took about 2minutes start to finish in the food processor.


Ingredients:

1 red onion
1 garlic clove
1/4 of red pepper
1tbsp of tomato passata
pinch of dried chilli flakes
1 tsp sugar
1tsp white wine vinegar
juice of 1/2 lime
pinch of salt
handful of fresh coriander

Recipe:
  1. Add onion, garlic and red pepper to blender and blitz for about 10seconds (or until finely chopped) and add the passata and coriander and allow to mix.
  2. Next blitz in the coriander and chilli flakes until the desired constituency and mix in the white wine vinegar, salt and sugar by hand.
  3. Add a squeeze of  lime juice and taste to check whether it is too sweet or too sour and adjust accordingly.  Then, dig in!


Monday, 16 May 2011

Bagel Making

Neil and I both love to cook and after I posted the pic of the everything bagel the other day Neil suggested we have a go last night.


We used a variation on the recipe I linked previous which you can see in it's altered form below as there were a few things that we didn't have in the cupboard.  This recipe makes 6 bagels and if you can get through them as quickly as us, I would recommend doubling up!

Ingredients:
1 cup warm water
1/4 ounce active dry yeast (1/4 oz package envelope)
1 1/2 tablespoons granulated sugar
2 1/2 cups plain flour, divided
1 teaspoon salt
1 teaspoon vegetable oil, divided
1 1/2 teaspoons granulated sugar
Nob of butter, melted
Toasted chopped onion & 3 garlic cloves

Directions:
Prep Time: 2 1/2 hrs
Total Time: 3 1/4 hrs

1. Combine the warm water, yeast, and the 1.5 Tablespoons of granulated sugar in a mixer with a dough hook. Let stand 5 minutes until the yeast activates and the mixture becomes foamy.

2. Gradually add 2 cups of the flour and the salt and mix with dough hook until combined.

3. Slowly add the additional 1/2 cup flour while working with your hands. Turn onto a lightly floured surface and continue to knead until smooth and no longer sticky (add up to 1/2 cup more flour if necessary).

4 Grease a large bowl with 1/2 teaspoon vegetable oil and roll the dough ball to cover all sides. Cover and let rise in a warm spot for about an hour (or until almost double in size).

5. After an hour, punch the dough down and divide into 6 equal pieces. Roll each piece into a 6" log and combine the ends with a little moisture (make sure they are joined or you will end up with cresents).

6. Place the bagels on a greased baking sheet, cover, and let rise again for 20 to 30 minutes (no longer).

7. Preheat oven to 200 degrees Celsius.

8. Bring a large pot of water, flavored with the 1.5 teaspoon of sugar, to a boil. Drop the bagels into the water and boil for aprox 30 seconds on each side.

9. Upon removal from the boiling water, place the bagels onto an oiled baking sheet. Place into a preheated 200 degree Celsius oven.

10. Bake for 5 minutes. Remove and brush with an egg yolk. Top with desired toppings and put back into the oven for 20 to 25 minutes. After 15 minutes, turn oven down to 135 degrees Celsius. Remove when golden brown and hollow sounding.

11. Cool on a wire rack or if like us gobble immediately.

Boiling the bagels

Preparing for the first bake
Buttering them up before the final bake
Baking nicely in the oven


Share

Search This Blog